 More
More Contact
 Submit
 Premium
Most of the online services that are used throughout this guide either use a Google account, or require you to register an email address. These should not be personal accounts, rather they should be registered to the club or organization. That way, the accounts can be easily passed on to the next individual who takes over as the site webmaster.
Blogger uses Google to host accounts, which makes sense since Blogger is owned by Google. You need to create a Club Account that will act as the administrator level account for your Club's Blog/Website.
Since most online services require an email address in their registration process, it makes the most sense to create a Google Gmail account:
You are now done for the moment. There are other changes that can be applied to support specific features at a later time. We will discuss those when necessary.
Blogger uses Google to host accounts, which makes sense since Blogger is owned by Google. You need to create a Club Account that will act as the administrator level account for your Club's Blog/Website.
Since most online services require an email address in their registration process, it makes the most sense to create a Google Gmail account:
- In a web browser, go to http://www.gmail.com.
- Under the login block, click the "Create an account >>" button.

- In the "Get started with Gmail" window, enter the appropriate information for a club account. Ensure that you click the "check availability" button to ensure that the desired email address is available.
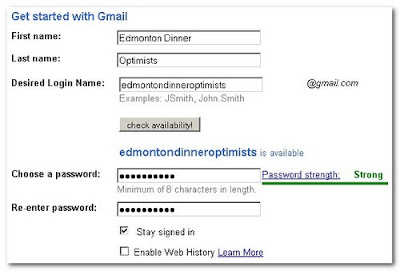
Write the password down and safeguard it, and continue with the next step. - Set your email recovery options. This is handy as it will allow you to recover or change the password in the event that you forget or lose the current one. Once completed, continue to the next step.

- Type in the CAPTCHA word, read the terms of service, and click "I accept. Create my account."

- At the congratulations window, click "Show me my account".

Believe it or not ... you still have more work to do. - This is what your GMail account will initially look like. There are some setting changes that need to be made to ensure that this account is as secure as possible.

- In the footer, click the "turn off chat" and "turn off buzz" links. Both of those features advertise the existence of the account and can expose the contacts list to people unnecessarily.

- In the left column, change the account status to "Invisible".

- In the header, click on "Settings".

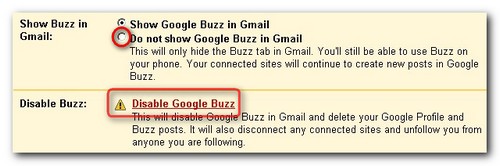
- In the Settings header, select "Buzz".

Scroll down to the bottom.
Select "Do not show Google Buzz in Gmail" and click "Disable Google buzz" (recommended). This will remove Google Buzz from the Gmail account.


You are now done for the moment. There are other changes that can be applied to support specific features at a later time. We will discuss those when necessary.

